
I hope this has been helpful! Happy cutting! -Ben
4 Comments
So you just installed a new wasteboard or you need to flatten your current one because its carved into way to much. In this blog post I'll walk you through just how to do it. When you first install your new wasteboard its important to flatten it. While the board my be visually flat, it will probably not be flat relative to the router. This is important because it will be different heights across the wasteboard. What could be 1 inch away from the router on the left side of the board could be 1 1/4 inches different on the right side. This is especially important when engraving or v carving fine details when the depth of cut is only 1/4 or less. It would end up cutting on one side and completely miss the board on the right. There are a few factors as to why it wont be perfectly flat to the router. The wasteboard thickness could be inconsistent from the factory, the machine could not be square, or you could have some sag in the span of the wasteboard.  I needed a mobile workbench for my heavy CNC machine. It's a shop build, so I don't want to spend a lot of time or money on it. I needed something quick and easy. I focused on making this build accessible to everyone's skill level and easy on the wallet. You could make this with only a drill and circular saw. I'll walk you through how to build it step by step. Total build time is around 1 hour. I built this to size specifically for my Carbide 3D Shapeoko XXL CNC machine, but you can put anything you'd like on it. It's perfect for the small shop where space is a premium. So you just got a Shapeoko touch probe and love it. However, you have no clue where to store it. Unfortunately, when not in use, the touch probe and the alligator clip can be a burden finding a safe and secure place to store it where they won't be in the way of moving parts. This mount helps solve that problem. Its 3D printed from PLA material. It can be mounted with glue, double sided tape, or with a few screws through the flat part of the base. Check out my Etsy listing to buy your own. Have your own 3D printer? Click HERE to download the file and print one for yourself! Don't have a 3D printer but want one? I recommend the Creality Ender 3! HERE to buy from Amazon Check out my YouTube unboxing of it HERE  I wanted to share with you the Amazon page of the tools i use and recommend in my workshop. Its filled with everything I use, from power tools, hand tools, CNC items to add-ons. I personally used each one of these products. If there is something not on the list that you think I should consider, please use the contact me page and let me know! Happy Making! -Ben Hey guys. I've decided to add a section to the blog where I feature a maker from time to time who does some cool stuff. The first one is about my brother-in-law, Brian's new YouTube channel. He's an artist at his core and his intro is my absolute favorite. He goes by Fiery Squirrel Art on the internet. Brian is a true geek and if video games and paint is your thing you'll love what he does. Help him out by liking and subscribing! |

It helps support what i do so I can create more free content :)

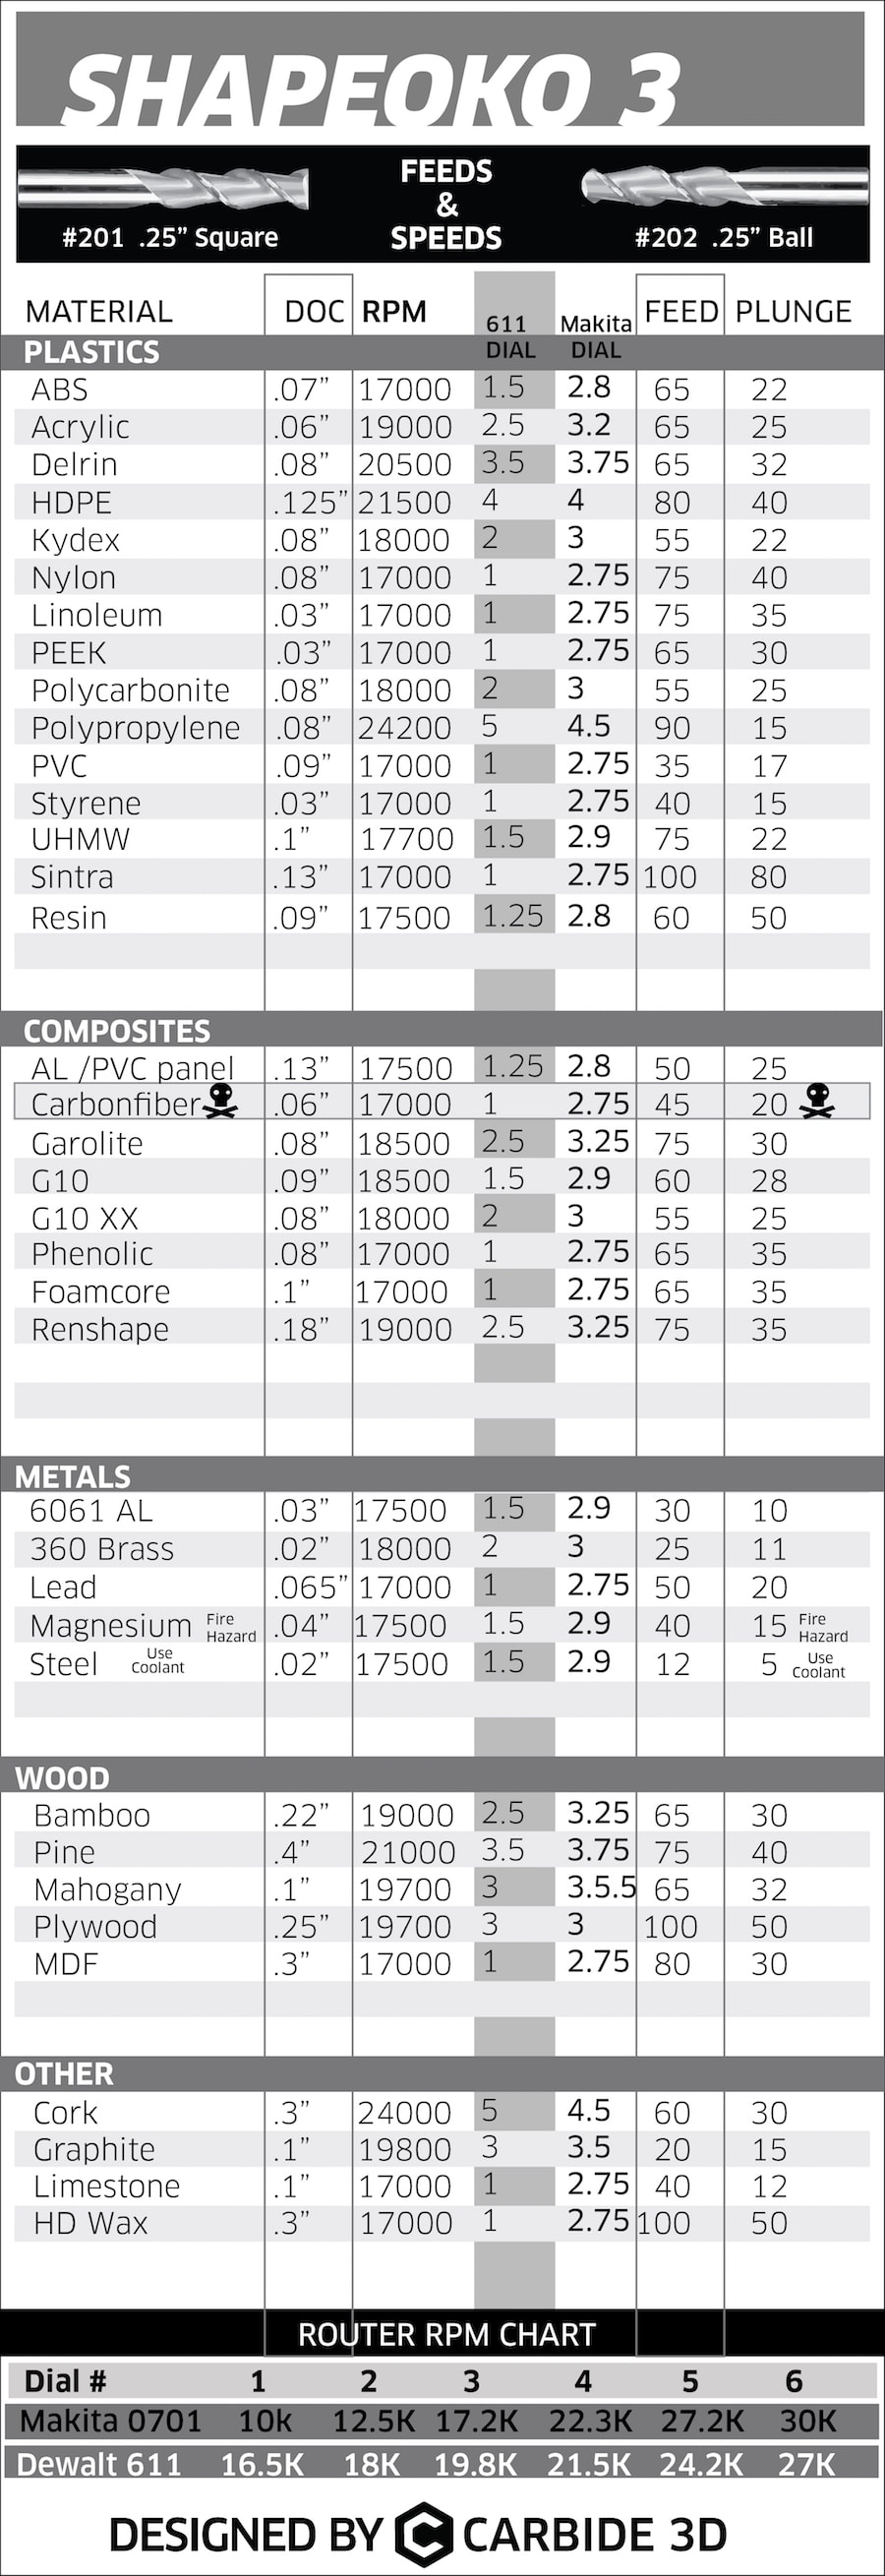
When you open the file you'll be looking at the bottom of the waste board. The t-nuts come up from the bottom. The larger circle is the base (washer-like) part of the t-nut and the smaller hole is where the shaft of the t-nut will go through. I programmed the file to use the cutter that came with your machine, #201, 1/4 up-cut bit. If you have a 1/8 bit it would be ideal to 'drill' the smaller holes with it. Generally, it is recommended to use a bit 1/3 of the size hole your going to create. If your having problem drilling the hole with the #201, use a 1/8 upcut bit.
You'll want to place the sheet at the very front of the machine against the metal lip and make sure it's centered. When you cut, you'll want to make sure that you use dust collection and wear breathing protection (I recommend the RZ Mask) because MDF dust is extremely fine and very harmful.
After it's done cutting the file, i predrilled and countersunk a few holes around the waste board we just cut to screw it to the waste board that came with the machine. Make sure you sink these screws at least 1/2 way through the material. You don't want to accidentally hit them with a bit! The 3/4 mdf we just cut with our hole pattern is called a supplemental waste board. Why don't we just replace the waste board that came with our machine? We do this because we will eventually mark up the board with through cuts and get to a point that it will need to be replaced. Its much easier to unscrew a piece of mdf and replace the smaller board than take the whole machine apart and end up having to re-square the machine. Unfortunately, You'll have to purchase a full 4x8 sheet of mdf to get the piece we need.
On some setups you'll see people have a L shaped fence on the front left of their machine. This allows a very quick x,y zeroing because the same point will be used over and over. Its a great choice if your doing constant, repeat work and can be added to this waste board easily. I chose not to do this for two reasons: My work is never consistent, and I occasionally have pieces hang over the front and back of the machine (engraving table tops). Instead I use a set of Oops Clamps from Suck-it Dust Boot Company and place two of them in parallel to form a 'fence'. Not only are the extremely low profile, they are cheap and easy to replace if you have an oops situation.
If you end up making this waste board please tag me on social media or email me pictures of your set up! I love seeing how others do their work and what modifications make your workflow more successful!
Happy CNCing!
Ben
1/4 - 20 t nuts *you need 5 packs, 240 in total* - https://amzn.to/2KWDsx5
1/4 - 20 hex bolts - https://amzn.to/2UgneU5
1/4 - 20 washers - https://amzn.to/2KXoFST

Categories
All
3D Printing
CNC
Deals
Featured Makers
Fiber Laser
Laser
Onefinity
Patreon
Podcast
Shipping
Shop Tour
The Build Guild Podcast
Tools
T-Shirts
Tundra
VR
Woodworking Projects
 RSS Feed
Archives
November 2023
June 2023
November 2022
August 2022
January 2022
November 2021
October 2021
March 2021
February 2021
January 2021
December 2020
November 2020
October 2020
September 2020
July 2020
June 2020
May 2020
April 2020
March 2020
February 2020
January 2020
November 2019
October 2019
September 2019
August 2019
July 2019
June 2019
May 2019
April 2019
March 2019
February 2019
January 2019
December 2018
October 2018
September 2018
August 2018